This file is part of: App-X11-Forward Development Template Stack
Copyright (c) 2024 Nico Jan Eelhart
This source code is licensed under the MIT License found in the ‘LICENSE.md’ file in the root directory of this source tree.
Quick content links (Reference to most common page sections)
- Basics
- Sub Containers
1 What
This Docker Linux (Ubuntu 24.04) container is designed for use on a Windows Docker (Desktop) host. Its purpose is to enable the development of GUI applications (such as C++, .NET, Rust, and others1) within a Linux Docker container and display the running application on a Windows host. Because Docker is headless (meaning no GUI support is available), we need a method to display the GUI application output (while debugging or running the application in release mode) on the Windows host system. Fortunately, this can be accomplished by combining the Docker Desktop container with a WSL2 environment and the vcxsrv server (XLaunch).
This container stack consists of several different containers, each created based on a Dockerfile and Compose file. There is one generic container from which the other containers extend; this is referred to as the Base Container. It provides the aforementioned environment but does not include any GUI frameworks such as .NET, Avalonia, or other C++ frameworks..
The other containers are referred to as sub-containers. These containers require the Base Container, and each adds a specific development framework (.NET Avalonia, wxWidgets, or another chosen framework). You can add any sub-container as you want, as long as it supports the Linux platform. See paragraph 3 for the currently supported sub-containers.
The Base Container is where the difficult work is done, including interacting with WSL and presenting the GUI output on the host. The sub-containers just add frameworks that use these features and help you develop a specific application.
1.1 Architecture of the Containers
To help you understand the Container setup better, below is an image that shows how the components interact after the setup is completed. In this example, we assume the .NET Framework is the Sub Container. We install the necessary components on the Windows Host (light blue square). In addition to the processes displayed in the image, this setup also includes fixed folders and data files, which are detailed in the table Data locations below
The Base Container
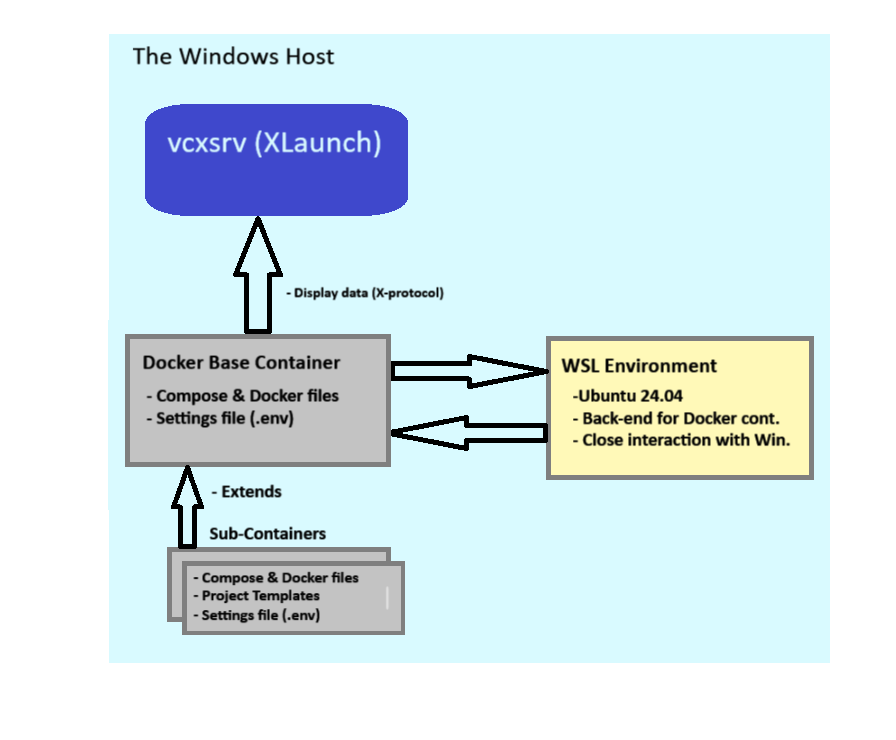 The Windows Host contains a vcxsrv server (download) process which handles the X-Protocol data sent from the docker Base Container. It uses the WSL environment as a back-end to prepare the data.
The Docker Base container (grey square) contains an Ubuntu image, with the Docker files to create itself and a Docker environment settings file called ‘.env’
The WSL environment (yellow square) acts as the back-end for the Docker container. Although WSL2 uses a lightweight virtual machine, it is specifically designed to run Linux distributions natively on Windows, providing efficient and direct access to Windows resources. The WSL environment handles graphical output from the Docker container, which is then sent to the vcxsrv (XLaunch) server on the host. To use WSL2, Docker needs to be configured accordingly; this will be described later in this document.
The sub-containers consist of different self-contained containers that handle specific tasks. For example, there is currently one simple sub-container included called: Afx-X11-Forward-NET-Service. This extends the Base Container with functionality for the .NET runtime and all required libraries. It manages the development of a simple command-line example, including building, debugging, and running .NET applications using Visual Studio Code (VSC).
Data Locations, Within root ‘APP-X11-Forward-Development-Template-Stack'
| Folder | Purpose |
|---|---|
| .\ | ‘APP-X11-Forward-Development-Template-Stack’ Root folder |
| .\Base-Container | Root folder for the Base Containers |
| .\Base-Container\Afx-Base-Service | The Base Container .The docker and compose file are here. |
| .\Base-Container\Afx-Base-Service\wsl2distro | This contains the WSL environment after installation (.vhdx file). |
| .\Sub Container | Root folder for the Sub Containers |
| .\Sub-Containers\Afx-X11-Forward-NET-Service | Sample Sub Container with .NET with a simple CMD program, no GUI |
| .\Sub-Containers\Afx-X11-Forward-NET-Service.vscode | These are the (prepared) settings of VSC when you open a container via the host. |
| .\Sub-Containers\Afx-X11-Forward-NET-Service\Project-Template | Template used by Sub Container docker to create your app |
| .\Sub-Containers\Afx-X11-Forward-NET-Service\Projects | Bind mount folder, which you can use for your projects |
| .\Sub-Containers\Afx-X11-Forward-NET-Service.env | Settings use by the Docker Compose and Dockerfile |
| .\Howto’s | Documentation |
Side note: Security Considerations and Network Configuration
Security Considerations and Network Configuration
For personal use on a developer’s PC or laptop, security risks are generally lower than in a production environment. However, it’s still a good idea to follow some basic security practices. When running an X server (like vcxsrv) on your Windows host, configure vcxsrv to only accept connections from the local machine. This minimizes exposure and ensures that only applications on your PC can access the server. Additionally, keep your firewall enabled and set to block unsolicited incoming connections. While this setup is for development purposes and may not require strict security measures, these simple steps can help protect your system against unexpected threats, especially when connected to less secure networks.
In practice, this means that as a developer, you should leave the XLaunch ‘Extra option’ -> Disable access control unchecked
2. Create the Base Container
This chapter will cover the setup of the Base Container Service (folder: ‘Base-Container’) and everything else required to run a GUI application on a Windows host. At the end of this setup, we will demonstrate that the program works as expected by executing a sample X application in the Base Container (xeyes).
2.1 The Basic Container Setup
Before executing the Docker Compose file, ensure that the following items are installed and configured (refer to section 1.1, Process Architecture). The steps for these items will be explained in more detail in the following paragraphs:
Overview
- Download the WSL version of Ubuntu: Obtain the special version of Ubuntu for WSL (Download). Scroll to the bottom of the page for manual versions.
- Install WSL2: Set up a dedicated WSL2 environment to serve as the backend for the Docker container.
- Configure the WSL Ubuntu Distribution: Ensure that the WSL Ubuntu distribution is properly configured.
- Install and Configure an X-Server: Install an X-server on the Windows host; we use VcXsrv (Download) for this purpose.
- Run Docker to Create the Basic Image: Execute the Docker files to create the basic container image.
- Verify the Setup: Display the result to demonstrate that everything works correctly.
2.1.1 Download the Special Ubuntu WSL version
Finding this version can be a bit challenging, especially because we need the manual installation files (with the .Appx or .AppxBundle extensions). The Windows Store provides a direct installer, but we cannot use it because we need to control the installation name and location. Follow these steps:
- (Download) the image from here, Scroll to almost the bottom where it states ‘Downloading distributions’ and choose the Ubuntu 24.04 link (note that this is the distribution we support, you may try other ones and be fine with it, but we have not tested it)
-
Now, as of Aug 2024, a lott of documentation\samples will state that your receive *.Appx extension file and that you need to change the file to *.zip. But in our case you probably receive a *.AppxBundle file which contains multiple Ubuntu versions. Below is shown how we get access to the right folder so we can install it in the next paragraph (in my case the download name is ‘Ubuntu2204-221101.AppxBundle’ we use this name in our example:
- First rename ‘Ubuntu2204-221101.AppxBundle’’ to ‘Ubuntu2204-221101.zip’
- Unpack the file with for example 7zip
- In the unpacked folder locate the file for your machine distribution ,likely *‘Ubuntu_2204.1.7.0_x64.appx’ rename this file to *.zip
- Unpack the above renamed zip file
- In the resulting folder you should see a file called ‘install.tar.gz’ this is the location where the next command has to point to.
2.1.2 Install the Ubuntu WSL version
When we have the distribution source, we can install the WSL environment. To keep the Base Container files in one place we do this in the root of our Base-Service folder ( ’./Base-Container/Afx-Base-Service/wsl2distro’*).
- Open the sub folder: ‘.\Base-Container\Afx-Base-Service' with a CMD
- Execute this command and replace the install.tar.gz.file with the result from the previous step
wsl --import Ubuntu-docker-App-X11 ./wsl2-distro install.tar.gz
This creates the Ubuntu-docker-App-X11 WSL in the: ./wsl2-distro. WSL check commands:
wsl --list --verbose    # Displays the distribution name, state, and there version
wsl --unregister YourDistributionName       # Remove the distribution
                                            # More WSL command in the next paragraph
2.1.3 Configure the Ubuntu WSL version
To start and manage your WSL2 Ubuntu distribution, use the following command:
wsl -d Ubuntu-docker-App-X11      #  This will open a CLI terminal and start the WSL if needed
                                  #  Use 'exit' to return to Windows. while it remains started
wsl --list --verbose              #  Optional. Check if it is running (in other Windows CMD)
wsl --terminate Ubuntu-docker-App-X11    #  Stops the distribution
wsl -d Ubuntu-docker-App-X11 -- ls /home #  Start, exec command, and returns direct(no CMD)
wsl --set-default Ubuntu-docker-App-X11  #  Set default when running command; wsl
Next we need to update and configure our distribution. Make sure our distribution is started, and the execute the following Linux commands:
apt update && apt upgrade -y      # Update the Ubuntu distribution

# The next command will update our DISPLAY environment variable
export DISPLAY=$(grep -oP "(?<=nameserver ).+" /etc/resolv.conf):0

echo $DISPLAY                     # Display the variable afterwards: echo $DISPLAY

# Make sure the Variable the DISPLAY is set permanent in the .bashrc file
echo 'export DISPLAY=$(grep -oP "(?<=nameserver ).+" /etc/resolv.conf):0' >> ~/.bashrc
source ~/.bashrc                  # Reload

# Optional to logout and leave the wsl running
exit
2.1.4 Install the X-Server (VcXsrv)
To install the X-server and receive graphical output from the application, follow these instructions:
- Download and Install the VcXsrv software.
- After installation start XLaunch
- Select Multiple Windows and click Next
- Select Start no client* and click **Next
- Ensure that Clipboard and Native opengl are enabled’
- Ensure that Disable access control is not enabled ( this is more secure; only enable it if you encounter issues) click Next, then Finish
2.1.5 Create the basic Docker Container
Finally, to create an start the base container.
- Open the service sub folder: **’.\Base-Container\Afx-Base-Service*’ within a CMD
- We use a fixed IP address in the Compose file to make it easier to communicate with services, such as an SSH server (not used in this setup). While this is not strictly necessary, we have included it by default. If you encounter any issues, you may choose to remove it from the compose_app_forward_x11_base.yml file. The pre-configured IP address used can be found in the .env file. see:
FIXED_SUBNET # Default: 172.20.0.0/16 FIXED_IP # Default: 172.20.0.15
- Execute this command in the service sub folder
docker-compose -f compose_app_forward_x11_base.yml up -d --build --force-recreate --remove-orphans
Warning!
When recreating the same container(service name) avoid subtle/annoying caching issues, to avoid irritation, make sure to:
- delete the container
- delete the volume and </small
- use the Docker prune command,so:
docker system prune -a --volumes
2.1.6 Connect the Wsl from 2.1.2 to the docker container
- Ensure that this WSL distribution is connected to your Docker setup
- In Docker -> Settings -> Resource -> WSL integration
- In the ‘Enable integration with additional distros:’ section (if you don’t see this option, press: Refetch distros)
- Select Ubuntu-docker-App-X11 Make sure only this one is selected!
- Press Apply & Restart (You may need to restart the Docker container manually). I had the experience that it did not do anything after pressing ‘Apply’, when Started Docker Desktop with Admin rights it was fine
2.1.7 Verify the Setup
- After running the command in 2.1.5 you can open Docker Desktop and in the container section a new container is created under the name: ‘afx-basic-service/axf-basic-service-1’. Open a terminal session in this container
- Under the Images tab of Docker Desktop you should see the image eelhart/appforwardx11-base This is the image that will be used by the Sub Containers that you may create (see paragraph 3) to add different development environments to develop GUI applications.
Warning!
For the usage of the Sub Containers you may remove the container ‘afx -basic/axf-basic-service-1’ but you will need to hold on to the image eelhart/appforwardx11-base - Make sure the X-server(XLaunch) is started (see 2.1.4)
- Enter the following command in the Terminal shell:
xeyes # This should display a window with eyes on your Windows desktop
When successful a Window with a pair of eyes should be displayed
Side note: Docker call syntax
Docker calling context (Skip this if you know Docker basics)
Docker calling context Because we use Docker files (Dockerfile and compose) with descriptive names, such as Dockerfile_Nodejs_React_Cont instead of just Dockerfile, this affects how Docker commands are executed. For example, with a standard Dockerfile, we would use this command to reference the Docker file in the Docker Compose file:
context: .
dockerfile: Dockefile
In our case, we cannot use the default name but have to specify the name we gave, thus:
build:
context: .
dockerfile: Dockerfile_Nodejs_React_Cont
The same applies for using the build command. With the default Dockerfile, you can use this:
docker build
# This will assume a file: Dockerfile is available
With the named file, we have to use
docker build -f MyDockerFileNameHere
The same applies for running the Compose file (use -f option)
Side note: Create Project from Template
Create Project from Template
Skipp this if you known how to deal with copy\customize docker files
To adapt the template directory for your project, follow these steps. This guide assumes you’re using the React stack; if you’re working with a different stack (e.g., PHP, Rust), simply replace “React” with the stack name your are using.
- Copy the whole directory to a new directory (MyReactStack) for your project:
copy "React Development Template Stack" MyReactStack
Within your MyReactStack open the [name]Service directory
Warning When using multiple containers, it’s a good idea to rename this [name]Service directory (for example, by adding a number) before proceeding. Otherwise, the containers will be grouped together, which is generally helpful, but this can lead to caching issues in certain container stacks, such as React. These issues may manifest as the same directories appearing in the container from a previous instance after running the compose_nodejs_react_cont.yml command. Caching problems can be quite troublesome in some Docker stack configurations- Customize the Dockerfiles: Since most Docker Compose setups involve a parent-child relationship (i.e., chaining), a change in one Dockerfile requires updates to all related docker files.Follow these steps:
- In the first compose_* file change the ‘services name’ to an appropriate name for you:
services: webserver-nodejs-react: # Us always lowercase!
- The ‘service name’ may appear more than once in the same file, update these as well!
- Changes the ‘service name’ from step 1 in the other ‘compose_* files’
- Check the compose_* files when it contain a image name than update this to your own image name:
context: . dockerfile: Dockerfile_Nodejs_React_Cont image: eelhart/react-base:latest # i.e: [yourname/react-prjx]- Lastly, update the ports to ensure that each host port is unique across all running containers. In your Docker Compose file, you might see this configuration:
ports:
  target: 3001        # Container port.
  published: 3002     # Host port, Make SURE it is unique

# Alternatively, the syntax might look like this (achieving the same result):
ports:
  - "3002:3001"      # host:container
Make sure that Host port: 3002 is not used by any other docker container or other services on your host!
3. Creating the Sub Containers
This section includes several combinations of docker files and compose files, these can be used to create different Sub containers. Make sure you have first created the Base Container as described in paragraph 2!
In the folder Sub-Containers We store our sub containers in a separated folder, per service, currently there is only one:
- Afx-X11-Forward-NET-Service
This installs the .NET framework and the required libraries, and it will create a simple sample command-line application based on a template project.
3.1 Creating the .NET Sub Container (afx-x11-forward-net-service)
This will create a basic .NET Command-line application that will return, guess? …Yes!; “Hello World”. This program does not output the text on the X11 Windows in the host. It is meant to prove that the Base Container can be extended, and to show how it can be done. In addition it will create a project, based on a template, and demonstrate how to use Visual Studio Code (VSC) to Debug and run the application on the Windows host. See paragraph 4 for VSC instructions.
Note: We already have proven that that GUI output from the Linux application is displayed in our XLaunch Window on the Windows Host, if did not see this you can open a terminal in the Docker container and enter the command:
xeyes
Create the Application project:
- Open a CMD in the folder .\Sub-Containers\Afx-X11-Forward-NET-Service\
- In the file .env file, set the variable ‘PRJ_NAME_ARG’ to a value for your project name. Optional you can also set the environment variable from the command line, This value will be used for the project name and the project directory.If you omit this step the default will be used (see variable: PRJ_NAME_ARG in the .env file)
$env:PRJ_NAME_ARG="my-project" # From Command line
3 Then execute the docker command
docker compose -f compose_net_x11_project.yml up -d --remove-orphans --build --force-recreate
Note that this compose creates and builds the project.
3.1.1 Setup Result
- After running the commands in 3.1 you can open Docker Desktop and in the container section a new container is created under the name: ‘afx-x11-forward-net-Service/afx-dotnet-container-1’.
- Open a terminal session in this container
- Enter the following command in the terminal session :
dotnet run
The world famous text (for developers) should appear!
3.2 Creating an Avalonia .NET Sub Container (afx-x11-forward-avalonia-service)
This process will create a GUI project for an Avalonia UI .NET application. For more information, visit the Avalonia site.
Different projects can be created based on the Avalonia template. Additionally, a custom template created by us is used to instantiate your project by default.
Steps to Create an Avalonia Base Application Project:
- Open a Command Prompt in the folder: .\Sub-Containers\Afx-X11-Forward-Avalonia-Service\
- Configure the project:
- Open the .env file to adjust the necessary settings:
- Project Type By default PRJ_TYPE_USE_CUSTOM_APP iss et to create a basic application based on our custom template. You can disable this to choose one of the Avalonia-provided templates by setting the variable: PRJ_TYPE_ARG.
- Project Name: Set the variable PRJ_NAME_ARG to your desired project name. This will be used for both the project name and the project directory.If omitted, the default value from PRJ_NAME_ARG in the .env file will be used.
- Network Configuration: If needed, you can specify an alternative subnet and IP address by adjusting the variables FIXED_SUBNET and FIXED_IP.
- Open the .env file to adjust the necessary settings:
- Execute the Docker command to create the project.:
docker compose -f compose_avalonia_x11_project.yml up -d --remove-orphans --build --force-recreate
Note that this compose creates and builds the project.
3.2.1 Setup Result
- After running the commands in 3.2 you can open Docker Desktop and in the container section a new container is created under the name: ‘afx-x11-forward-avalonia-Service/afx-avalonia-dotnet-container-1’.
- Open a terminal session in this container
- Check with the ‘pwd’ command to confirm the project is a sub directory of: “ava/”
pwd # /ava/your-project-name
- Enter the following command in the terminal session :
dotnet run
This should display Application GUI on your host via the XLaunch program
- You should be able to open, build, and debug the project in Visual Studio code, See paragraph 4 for details
3.2.2 Post setup Checks (When needed)
This section outlines the required Visual Studio Code (VSC) plugins and configurations. These should already be installed and set up if you are using our custom application template (see PRJ_TYPE_USE_CUSTOM_APP). In this case, the project file and .vscode directory will include the necessary settings. For other project types (PRJ_TYPE_ARG), you must configure these manually. If something seems wrong, you may want to verify the settings as well. (Click on Side note below to expand the section)
Warning 1 As of Sept. 2024, you might need to change one thing. Be sure to install version 0.29 of the Avalonia for Visual Studio Code plugin. There is a persistent parsing error in versions up to 0.31 that pops up whenever you type. See more details here
Side note: Visual Code installed and configured in the Container
*Visual Code Plugins installed and configured in the Container
- General plugins
- C# Dev Kit
- Avalonia for vscode (by Avalonia team)
This feature for XAML development and auto complete features (Requires .NET Core 8.0) WARNING Make sure to install version 0.29, untill version 0.31 there is a super annoying parse error which pops-up when every you type something, see here. When a higher version then 0.31 is released you can test that version to check if it still there.
- Kir-AntipovHot Reload plugin should already be part of this project, this is how it defined:
- Project file should contain (Copy this if not)
<PropertyGroup Condition="'$(Configuration)' == 'Debug'"> <DefineConstants>$(DefineConstants);ENABLE_XAML_HOT_RELOAD</DefineConstants> </PropertyGroup> <ItemGroup> <PackageReference Condition="$(DefineConstants.Contains(ENABLE_XAML_HOT_RELOAD))" Include="Avalonia.Markup.Xaml.Loader" Version="11.1.0" /> <PackageReference Condition="$(DefineConstants.Contains(ENABLE_XAML_HOT_RELOAD))" Include="HotAvalonia" Version="1.1.1" /> <PackageReference Include="HotAvalonia.Extensions" Version="1.1.1" PrivateAssets="All" /> </ItemGroup> - In project ReactiveUI Package should be present, check if it is
PackageReference Include="Avalonia.ReactiveUI" Version="your_version_here" # alternatively added it with: dotnet add package Avalonia.ReactiveUI - Next initialize HotAvalonia in the App.axaml.cs (This should already be done, but for your reference)
- Using directive
using HotAvalonia; - In the method ‘ public override void Initialize()’ add:
this.EnableHotReload(); // HotAvalonia Ensure this line **precedes** AvaloniaXamlLoader.Load(this);
- Using directive
- Make sure the
.UseReactiveUI();is called in AppBuilder.Configure() see program.cs. This also requires:using Avalonia.ReactiveUI; - Run task -> Watch run Avalonia Change an *.axaml and the program output should be adapted
WARNING: When Visual Code complains about multiple project and refuses to start, it is likely due to the fact that in the same folder a solution file automatically created for you :(
removing/relocating this file might solve the issue, to prevent it from creating:
- Look for installed plugin ‘C# Dev Kit’
- press Extensions settings
- Uncheck ‘Automatically Create Solution In Workspace’
- Reload your project.
*Thanks: to Kir_Antipov Github for providing the required tools to make this work!
- Project file should contain (Copy this if not)
3.3 Creating an .NET GTK Sub Container (Afx-X11-Forward-NET-Service-GTK#)
This is a shorted instruction set, to install the .NET GTK sharp Sub Container, based on GTK 3.24.24.
1) Create the sub container
Create the .NET GTK Sub container (folder: ‘Afx-X11-Forward-NET-Service-GTK#’):
docker-compose -f compose_net_x11_gtksharp_project.yml up -d --build --force-recreate --remove-orphans
2) Start the Docker sub container via the WSL (optional)
Execute the following command:
wsl -d Ubuntu-docker-App-X11-Win32Dev
docker exec -it afx-x11-forward-net-service-gtk-axf-dotnet-gtksharp-container-1 /bin/bash
When the container cannot be found, restart the Docker app and ensure WSL integration is enabled in Docker settings!
3) Start the sub-container in Visual Studio Code
Install the following extension(s) in the container
code --install-extension ms-dotnettools.csharp
code --install-extension ms-dotnettools.csdevkit
code --install-extensionms-dotnettools.vscode-dotnet-runtime
3.3.1 The project Template and specific tasks in VSC
Project structure
After opening your GTK3 .NET project you find a ‘src’ folder with the following structure:
- src –» root source folder
- backend –» .NET class libraries. See VSC task: ‘2.1 AFX …’ below
- cl_example –» simple sample class library
- cl_example –» other sample class library, with simple Rest example
- frontend –» GTK3 csharp code
- Program.cs –» main program using the sample libraries
- backend –» .NET class libraries. See VSC task: ‘2.1 AFX …’ below
VSC Tasks
You can use the following tasks in Visual Studio Code:
| Tasks | Used for |
|---|---|
| 1.1 AFX Build GTK App (Debug Windows) | Debug Build all for the Windows platform |
| 1.2 AFX Build Release GTK App (Windows & Linux) | Release build ofr Linux and Windows Platforms |
| 2.1 AFX CREATE: Class Source Library | Creates a class library in the directory: src/backend/ see Remark 1 |
| 3.1 AFX Run GTKApp (Windows Release) | Run the app in release mode |
| 4.1 AFX Clean a specific Library | Cleans a specific class library |
| 4.2 AFX Clean the application | Cleans the frontend application |
| 4.3 AFX Clean ALL | Clean all libraries and frontend application |
Remark 1
Make sure the class library start with: ‘cl_‘ followed by a descriptive name. This makes sure:
* That the class libraries are created in a folder with that name on src\backend\cl_yourname
* During the build process the cl_ is replaced with with ‘lib_‘ resulting into library: lib_yourname
* The clean tasks 4.x wil work properly, because they act on these names!
3.4 - A PHP/Python/Rust Sub container
General purpose container for PHP, Python and Rust development, contains a default project template with all this languages. More (setup) information here: Quick Setup
4 Develop with VSC in the host
To develop in Visual Studio Code we advice the following instructions. Note that this is a general instruction applicable for all sub containers, any specific issue will be described in the ‘README.md’ in the root directory of the sub container, this all includes specific VSC task and project structure.
4.1. Open the .NET application container in VSC (@host)
- Press CTRL-SHIFT-P or F1 and select (start typing) Attach to running container…
- Select fore example the afx-x11-forward-avalonia-service sub container, or any other sub container
- Alternatively you might click on the Docker boot on the left toolbar and select the container from there, this opens a new Window with the container information
4.2. Open Folder and building your app.
- Use the VSC Explorer and the Open Folder to open the remote container’s folder. Ensure you open the correct folder so that the .vscode directory settings are applied properly.
- Select Open Folder and enter: /projects/ava/your_project_name (for Avalonia). This will ensure the project is loaded along with the settings configured in the .vscode folder. (Alternatively, you can obtain the path by opening a terminal inside the Docker container. The initial folder shown by the pwd command will give you the correct path.)
When opening the .NET container and the project root folder in Visual Studio Code, a dedicated Visual Studio Code server will be installed within the container. This server provides a full Visual Studio Code environment with its own settings and extensions. Upon opening the folder for the first time, the system will detect any required extensions and prompt you to install them. Follow the instructions to complete the installation if prompted.
In case the intellisense indicates errors in one of the project files this is probably due to the missing of an extension.
Side note: VSC Settings files
VSC Settings files
Settings file
To change the build targets and related settings you will need to update the files in the .vscode directory of the project (this is the reason you have to open the right project directory, opening the right directory make sure the project directory is the root and VSC searches for a ‘.vscode’ directory in the root to apply settings to this project) the following settings files are available in ‘.vscode’:
- .vscode/tasks.json: For build tasks.
- .vscode/launch.json: For debugging configurations.
- .vscode/settings.json: For general VS Code settings specific to your project (e.g., editor preferences, linting settings). In case you have to customize the build properties or other settings these files should be updated.
4.3 VSC Build tasks
Most of the build an launch task are pre-created for you, for example the Avalonia project has the following tasks: In the menu ‘Terminal -> Run Tasks…‘ You can find the build task for the Avalonia project, which are defined in the settings file (see side note above). The following are defined for our project:
- Clean: All Build Output
- Debug: Build Configuration
- Debug: Restores NuGet Packages
Almost all ways called automatically - Release: Build Configuration
- Release: Restore NuGet Packages
Almost all ways called automatically - Watch XAML Build
This makes sure you can see the ‘live output’ of the application while your updating the XAML file(s) For other sub-container other task might be available, but most of them should be self explaining
-
Of course, any Linux GUI application can be displayed via Docker on the Windows host; it is not limited to development. ↩