Quick links (Reference to most common page sections)
Python, Rust, C++ Container - Docker Setup & Usage Guide
ℹ️ Introduction
This is a Linux Docker cross-compiler image designed for applications with a Frontend module in Python and a Backend module in Rust (optionally combined with C++).
This Docker container (based on Ubuntu 24.04) is intended for use on a Windows Docker Desktop host. Its primary purpose is to facilitate the development and execution of a GUI application within a Linux Docker environment, while rendering the application’s graphical interface on the Windows host. Since Docker itself is headless (i.e., it lacks built-in GUI support), additional steps are required to display the GUI application’s output (for debugging or running in release mode). This functionality is achieved by integrating Docker Desktop with a WSL2 environment and the VcXsrv X-11 server (XLaunch).
Alternative C/C++ Docker Container
This container is specifically designed for Python (frontend development) as well as Rust and C/C++ (backend development). A similar stack exists for Win32 C development, called the App-X11-Forward-Win32 C Development Template Stack
The container stack is composed of multiple specialized sub-containers, each built from its own Dockerfile and Compose file. At its core is the Base container, which provides essential build tools and dependencies. Note, however, that the Base container does not include any GUI frameworks or predefined project templates. The sub-containers, extend the Base container. Each sub-container incorporates specific frameworks and/or template projects, customized for particular development workflows or use cases.
Architecture of X11 forwarding
To help you better understand the container forwarding setup, the diagram below illustrates how the components interact after the setup is complete. The necessary components are installed on the Windows host (highlighted in the light blue square).
In addition to the processes shown in the diagram, this section also describes the folder structure and data file organization. These details are provided in the table titled Data Locations at the end of this section.
The Base Container
 The Windows Host runs a VcXsrv server vcxsrv server (download) which handles the X-Protocol data sent from the Docker Base Container. This server uses the WSL environment as a back-end to process and prepare the data.
The Docker Base Container (grey square) is built on an Ubuntu image. It includes the Docker configuration files required to create itself, along with a Docker environment settings file named ‘.env’
The WSL environment (yellow square) acts as the back-end for the Docker container. Although WSL2 operates using a lightweight virtual machine, it is specifically designed to run Linux distributions natively on Windows, enabling efficient and seamless access to Windows resources. The WSL environment processes graphical output from the Docker container, which is then sent to the VcXsrv (XLaunch) server on the host machine. To enable WSL2, Docker must be properly configured, and this configuration will be detailed later in this document.
The sub-containers represent specialized, self-contained environments designed to handle specific tasks or projects. For example, these may include projects written in Python, Rust, or C/C++. Each sub-container extends the Base Container with the necessary libraries and tools for its respective project. These sub-containers facilitate development workflows, including building, debugging, and running applications—such as Win32 applications—using Visual Studio Code (VSC).
Network Security Considerations
Security Considerations and Network Configuration
For personal use on a developer’s PC or laptop, security risks are generally lower than in a production environment. However, it’s still a good idea to follow some basic security practices. When running an X server (like vcxsrv) on your Windows host, configure vcxsrv to only accept connections from the local machine. This minimizes exposure and ensures that only applications on your PC can access the server. Additionally, keep your firewall enabled and set to block unsolicited incoming connections. While this setup is for development purposes and may not require strict security measures, these simple steps can help protect your system against unexpected threats, especially when connected to less secure networks.
In practice, this means that as a developer, you should leave the XLaunch ‘Extra option’ -> Disable access control unchecked
Data Locations, Within root ‘APP-X11-Forward-PyCRust-Dev-Template-Stack'
./Project Root
├─📁 Base-Container
│    └─📁Afx-Base-PyCRust-Service
│       └─📁 wsl2distro              # Holds the WSL files (.vhdx file)
├─📁 Howto's
├─📁 Sub-Containers                  # Sub container installations
│  ├─📁  PyCRust-Project-Service     # Sub container PyCrust
│     ├─📁 .devcontainer             # VS code container settings
│     ├─📁 .vscode                   # VS Code Settings file
│     ├─📁 Project-Template          # Project Template source
│     └─📁 shared-host               # Interaction Host <> Docker
2 Create the Base Container
This chapter will cover the setup of the Base Container Service (folder: ‘Base-Container’) and everything else required to run a GUI application on a Windows host. At the end of this setup, we will demonstrate that the program works as expected by executing a sample X application in the Base Container (xeyes).
The Basic Container Setup
Before executing the Docker Compose file, ensure that the following items are installed and configured (refer to section 1.1, Process Architecture). The steps for these items will be explained in more detail in the following paragraphs:
Overview
- Download the WSL version of Ubuntu: Obtain the special version of Ubuntu for WSL (Download). Scroll to the bottom of the page for manual versions.
- Install WSL2: Set up a dedicated WSL2 environment to serve as the backend for the Docker container.
- Configure the WSL Ubuntu Distribution: Ensure that the WSL Ubuntu distribution is properly configured.
- Install and Configure an X-Server: Install an X-server on the Windows host; we use VcXsrv (Download) for this purpose.
- Run Docker to Create the Basic Image: Execute the Docker files to create the basic container image.
- Verify the Setup: Display the result to demonstrate that everything work
Download the WSL version of Ubuntu
For the rest of this installation we need the WSL Ubuntu manual installation files. Use the procedure in the Get the WSL Installation file to get the required installation file: ‘install.tar.gz’
Get the WSL Installation file🔧
Download the WSL Import file
- From here.
- Scroll to the “Downloading distributions” section.
- Download the Ubuntu 24.04 LTS (should result into a file called: ‘Ubuntu2404-240425.AppxBundle’)
- Unpack and get the installation from it in the next section
After getting the WSL Import file, get the installation from it
- Rename Ubuntu2404-240425.AppxBundle to Ubuntu2404-240425.zip
- Unpack it using 7zip or similar
- Find Ubuntu_2404.0.5.0_x64.appx
- Rename it to: Ubuntu_2404.0.5.0_x64.zip and unpack it.
- Unpack Result you’ll get the file: .\Ubuntu_2404.0.5.0_x64\install.tar.gz this is what you’ll use in the next step,
─── ✦ ───
Install the Ubuntu WSL version
When we have the distribution source, we can install the WSL environment. To keep the Base Container files in one place we do this in the root of our Base-Service folder ( ’./Base-Container/Afx-Base-PyCRust-Service/wsl2distro’).
TIP: When you use multiple AFX Stacks, you can share the same WSL. These instructions install the WSL in a subfolder of the Stack (e.g., ./wsl2-distro). However, you can store the WSL in a central location. To do this, modify the command part ./wsl2-distro to something like D:/WSL/WSL-Data/docker-dev-pycrust
- Open a Powershell CLI in the sub folder: ’./Base-Container/fx-Base-PyCRust-Service/’.
- Execute this command and replace the “install.tar.gz.file” with your location (full path)
wsl --import docker-dev-pycrust ./wsl2-distro "install.tar.gz"
- This creates a docker-dev-pycrust WSL distribution in: ./wsl2-distro.
- Useful WSL management commands:
# Verify installation
wsl --list --verbose

# Start the distribution
wsl -d docker-dev-pycrust

# Stop the distribution
wsl --terminate docker-dev-pycrust

# Execute command without opening terminal
wsl -d docker-dev-pycrust -- ls /home

# Set as default distribution
wsl --set-default docker-dev-pycrust

# Remove the distribution (if needed)
wsl --unregister docker-dev-pycrust
Configure the Ubuntu WSL version
Now we need to update and configure our distribution. Start the WSL distribution and execute the following Linux commands:
Note: For each step, select and run the entire numbered section—including all comments
# 1.1                                   # Update the Ubuntu distribution
apt update && apt upgrade -y

# 1.2.                                  # Make sure docker is installed in the WSL
apt update && apt install docker.io -y  # to be able to attach to a container in the Host

# 2.1 The next command will update our DISPLAY environment variable
export DISPLAY=$(grep -oP "(?<=nameserver ).+" /etc/resolv.conf):0

# 2.2.                                  # Display the variable (check)
echo $DISPLAY

# 3.1 Make sure the Docker daemon is start at start up
echo -e "\n# Start Docker daemon if not running\nif (! pgrep -x \"dockerd\" > /dev/null); then\n    sudo  dockerd & \nfi" >> ~/.bashrc

# 3.2 Let make sure to easily identify the container (prompt)
echo 'PS1="\[\033[91m\]WSL:\[\033[0m\]\[\033[0;33m\]${debian_chroot:+($debian_chroot)}\u\[\033[0m\]:\[\033[91m\] App-X11-Win32Dev \[\033[0m\]../\W# "' >> ~/.bashrc

# 4 Make sure to reload the start-up command, to apply the 3.* commands
source ~/.bashrc                  # Reload
Enter                             # YOU need to give an extra enter so the prompt returns
                                  # check with: ps -a  should show dockerd

# Optional to logout and leave the wsl running
exit
Install the X-Server (VcXsrv)
To install the X-Server in the Windows host, and receive graphical output from the WSL application, follow these instructions:
- Download and Install the VcXsrv software.
- After installation start XLaunch
- Select Multiple Windows and click Next
- Select Start no client and click Next
- Ensure that Clipboard and Native opengl are enabled’
- Ensure that Disable access control is not enabled ( this is more secure; only enable it if you encounter issues) click Next, then Finish
Create the basic Docker Container
Let’s get to the real thing and start creating the base container.
- Open the service sub folder: *’.\Base-Container\Afx-Base-PyCRust-Service*’ within a new CMD
- Make sure you are login into Docker
- We use a fixed IP address in the Compose file to make it easier to communicate with services, such as an SSH server (not used in this setup). While this is not strictly necessary, we have included it by default. If you encounter any issues, you may choose to remove it from the compose_app_forward_x11_pycrust_base.yml file. The pre-configured IP address used can be found in the .env file. see:
FIXED_SUBNET # Default: 172.25.0.0/16 FIXED_IP # Default: 172.25.0.18
- Execute this command in the service sub folder
docker-compose -f compose_app_forward_x11_pycrust_base.yml up -d --build --force-recreate --remove-orphans
- In Docker Desktop a container is present with the name:afx-base-pycrust-service/axf-basic-pycrust-service-1
- In Docker Desktop a image is present with the name: eelhart/appforwardx11-pycrust-base:latest This image is used by other sub containers!
Recreate Containers
When recreating the same container(service name) avoid subtle/annoying caching issues, to avoid irritation, make sure to:
- delete the container
- delete the volume and
- use the Docker prune command,so:
docker system prune -a --volumes
Don’t Delete the base image (yet)
The interesting parts will be inside the sub-containers that you are going to install next. For this reason, you can delete the created container (Because the sub container adds on to the base container), but you must keep the image file, as the sub-containers will need it!
But at this point: Don’t delete the base container yet. First, let’s ensure everything works as expected. This will be covered in the next subsections.
Remove Unused containers for good with:
docker system prune -a --volumes
Start Docker from the WSL Distribution
The Problem: When running multiple WSL distributions, Docker Desktop’s automatic integration (Settings → Resources → WSL integration) cannot reliably control which distribution is used—Docker may randomly select any enabled distribution.
Our Solution: Start the Docker container directly from a specific WSL distribution to guarantee predictable behavior.
Why Both Are Needed:
Prerequisites
- Enable WSL integration in Docker Desktop settings
- Go to Docker Desktop → Settings → Resources → WSL integration
- Select your WSL distribution (e.g.,
docker-dev-pycrust) and ensure only this one is enabled - Click Apply & Restart to activate the integration (this may restart Docker Desktop automatically)
- This step is essential for communication between WSL and Docker Desktop
- Restart Docker Desktop (the application, not just the container) if it did not restart automatically
- Without this, you may run into trouble when attaching from WSL
- Error symptom: “cannot find the container”
-
Ensure the container is running in Docker Desktop (check the dashboard)
- Use the specific WSL startup procedure described below
- Always start containers from the correct WSL distribution to ensure X11 forwarding works
Steps to Connect the Base Container
Execute these commands to attach to the container from the correct WSL distribution:
(Assumes default service name and WSL distribution name from previous steps)
  # Step 1: Start the specific WSL distribution using the PowerShell CLI
  # (Docker daemon inside WSL will start automatically - press Enter a few times if needed)
  wsl -d docker-dev-pycrust

  # Step 2: From within the WSL CLI, attach to the Docker container running on the host
  # (Use 'docker ps' from the host to verify the container name if you changed it)
  docker exec -it afx-base-pycrust-service-axf-basic-pycrust-service-1 /bin/bash

  # Troubleshooting: If the container cannot be found, restart Docker Desktop and try again
After these commands you can:
- Execute commands at the command line prompt (see: 2.1.7 Verify the Setup)
- Open the Docker container in VSC, with the correct WSL assigned (see section 4)
Docker Desktop WSL Integration: Required Setup & Workflow Choice
WSL Integration Is Required
Enabling WSL integration in Docker Desktop is always required for this development environment. This allows Docker Desktop to communicate with your WSL distributions and containers.
Two Workflows: Recommended vs. Automatic
1. Recommended Workflow (for most users, especially with multiple WSLs):
- Enable WSL integration in Docker Desktop (see steps below)
- Start containers directly from your chosen WSL distribution (using
wsl -d <distro>and Docker CLI) - This ensures predictable behavior and correct X11 forwarding.
2. Automatic Selection Workflow (not recommended, only for single/default WSL setups):
- Enable WSL integration in Docker Desktop
- Let Docker Desktop automatically select the WSL distribution when starting containers
- This can be unpredictable if multiple WSLs are enabled, as Docker may randomly select one.
Limitation: With multiple WSL distributions enabled, Docker Desktop may select any of them, leading to confusion or broken setups. Always prefer the recommended workflow above.
How to Enable WSL Integration
- Open Docker Desktop → Settings → Resources → WSL integration
- In the ‘Enable integration with additional distros:’ section:
- If you don’t see this option, click Refetch distros
- Locate and select
Ubuntu-docker-App-X11-Win32Dev - Ensure only this distribution is selected (disable others to avoid conflicts)
- Click Apply & Restart
- Docker Desktop should restart automatically
- You may need to manually restart the container if it doesn’t reconnect
Troubleshooting: If clicking “Apply & Restart” doesn’t take effect, try running Docker Desktop with Administrator rights, then repeat the steps above.
2.1.7 Verify the Setup
After running the command in section Create the basic Docker Container and the section above, we can test if the setup succeeded. Make sure the docker container is started from our WSL (see above)
Verify the X Output
- In the Docker container Bash CLI prompt (which you just opened via the wsl), enter:
xeyes
This should display a pair of eyes in a Window (X is working properly). When you don’t see it check if XLaunch is started.
Verify the build environment (optional)
- Use the ‘nano’ command to create a new file ‘hello.c’ with this content:
#include <windows.h> int WINAPI WinMain(HINSTANCE hInstance, HINSTANCE hPrevInstance, LPSTR lpCmdLine, int nCmdShow) { MessageBox(NULL, "Hello, Win32!", "Win32 Program", MB_OK); return 0; } - Check if we can build the program:
# BUILD Commands:
 i686-w64-mingw32-gcc hello.c -o out.exe        # Creates 32 bits App
 # x86_64-w64-mingw32-gcc hello.c -o out.exe    # Creates 64 bits App
 # i686-w64-mingw32-c++ hello.c++ -o out.exe    # Creates 32 bits App
 # x86_64-w64-mingw32-gcc hello.c++ -o out.exe  # Creates 64 bits App
- And finally check if it runs
wine ./out.exe
This should display a Window with ‘Hello’ in it (Build configured properly)
Verify the Linux C/C++ build environment (optional)
- Lets see if the default Linux gcc is available
gcc -v
# This should display the Linux target in the string. It should contain:
# ...
# Target: x86_64-linux-gnu
# ...
# The following command returns all available targets:
ls /usr/bin/*gcc*
# Which should contain at least:
# ...
# /usr/bin/x86_64-linux-gnu-gcc-13
# /usr/bin/x86_64-w64-mingw32-gcc-13
# ...
Verify the Python and Rust environment (optional)
- Python an Rust available?
python3 --version
# This should display the Python version, in my case : 3.12.3
#
rustc --version
# This should display tte Rust version, in my case : 1.82.0
#
When these tests are passed your basic container is good to go.
2.2 What do we have and What’s next?
After the previous setup, the Base Container now includes:
- MinGW - Win32 cross-compiler (32-bit and 64-bit support)
- Wine - Windows emulator for running Win32 executables
- X11 forwarding - Configuration to display GUI applications on the Windows host
- GCC C/C++ - Development tools
- Python - Development tools
- Rust - Development tools
How It Works (Graphical output to the Windows Host)
We now have a Docker container that uses MinGW to provide the Win32 API for creating basic Win32 desktop applications for Windows. The created application can be executed in this Docker container using Wine, a Windows emulator. The X11 configuration, which is part of this setup, along with the XLaunch server on the Windows host, ensures that the executed application is displayed in a window on the Windows host.
What’s Next:
Next, proceed to Section 3, where you will set up a Docker sub-container containing a template application. This template combines a Python framework as the front-end with a Rust/C/C++ implementation as the back-end.
3. Creating the Sub containers
This section explains how to create a sub-container, which houses the actual pycrust template project. Currently, there is only one sub-container, but additional template versions may be introduced in other sub-containers in the future. Before proceeding, ensure that you have already created the Base Container as described in the previous section and verify that it is functioning correctly.
In the Sub-Containers folder, each sub-container is stored in its own separate folder. Sub-containers typically include specific project templates, such as Visual Studio Code settings, build tasks, and any required build tools or libraries. This particular image is designed for Python, Rust, and C/C++ development, so the focus will be on these languages, their tools, and frameworks. The resulting application will be displayed in a window on the Windows host.
Creating pycrust template application (compose_pycrust_project)
This sub-container is used to create a project that combines a front-end (GUI/Web) with a back-end (Rust, C/C++) application. In the .env file, the following setting is used to install the template project:
PRJ_TYPE_USE_CUSTOM_APP=Yes
Refer to Section 4 for the global usage of this container in Visual Studio Code (VSC). Any specifics regarding the usage of this container in VSC will be detailed at the end of this section.
Steps to Create a pycrust template project container
- Open a Command Prompt in: .\Sub-Containers\PyCRust-Project-Service\
- Configure the project:
- Open the .env file to adjust the necessary settings:
- Project Name: Set the variable PRJ_NAME_ARG to your desired project name. This will be used for both the project name and the project directory.If omitted, the default value from PRJ_NAME_ARG in the .env file will be used.
- Network Configuration: If needed, you can specify an alternative subnet and IP address by adjusting the variables FIXED_SUBNET and FIXED_IP.
- Open the .env file to adjust the necessary settings:
- Execute the Docker command to create the project:
docker-compose -f compose_pycrust_project.yml up -d --build --force-recreate --remove-orphans
Note: This will create a container and a PyCRust Win32 Desktop template project by default.
Attach to the pycrust container
After running the commands in 3.1 you can start the pycrust sub container’ in combination with the WSL. See the side note: Start Docker via WSL if you need help with this. Once started you can use Visual Studio Code (VSC) to start developing the application you planned to, for help with VSC see Section 4. Here in short the steps to start/attach to the container in a WSL distribution
- In an OS Terminal: Start the WSL and attach Docker in the WSL:
wsl -d docker-dev-pycrust

# In the Resulting WSL terminal attach the docker container:
#   - When it is not started you can do this here with:
      docker exec -it pycrust-project-service-axf-pycrust-project-1  /bin/bash
#
# In case of err see 'Error checks'

# Use command 'pwd' to check your directory location
# Make sure XLaunch is started on the host!
# WARNING: When the container can't be found, first try to restart the Docker service!
Commands to check your installation in the Docker terminal:
pwd                        # Should displays your project directory including source code
xeyes                      # Displays gazing eyes
python --version           # Displays Python version
Yes, your development will typically be in Visual Studio Code or another IDE, but these CLI steps should demonstrate that everything is working correctly.
4 Develop with VSC in the host
To develop in Visual Studio Code we advice the following instructions
- First make sure you have the following extensions locally install, to be able to work with the docker containers:
- Remote Development. Attach VSC to Docker(Develop directly inside our Docker container ), Remote WSL, Develope on remote SSH, GitHub Codespaces.
- Docker (Microsoft)
- Dev Containers (Microsoft) optional
Open the C++ application container in VSC (@host)
- Mak sure Docker can be attached from the WSL! See here
- Press CTRL-SHIFT-P or F1 and select (start typing) Attach to running container…
- Select our pycrust-project-service-axf-pycrust-project-1 container
- Alternatively you might click on the Docker boot on the left toolbar and select the container from there.
This opens a new Window with the container information
Open Folder and building your app.
- Use the VSC Explorer and the Open Folder to open the remote container’s folder. Ensure you open the correct folder so that the .vscode directory settings are applied properly.
- Select Open Folder and enter: /projects/pycrust/project_name. This will ensure the project is loaded along with the settings configured in the .vscode folder. (Alternatively, you can obtain the path by opening a terminal inside the Docker container. The initial folder shown by the pwd command will give you the correct path.)
Recommend extensions
For this Docker project we have a few extensions defined, please allow these in during the opening of the container, so when you see something like: ‘Do you want to install the recommended extensions from …‘ Press on the Install button, this makes sure all functionality will work as defined, see the file .vscode/extensions.json for the recommend extension list.
When opening the pycrust container and the project root folder in Visual Studio Code, a dedicated Visual Studio Code server will be installed within the container. This server provides a full Visual Studio Code environment with its own settings and extensions, which we have provided (see the side note below). Upon opening the folder for the first time, the system will detect any required extensions and may prompt you to install them. If so, follow the instructions to complete the installation. For a list of extensions, refer to the side note below.
Visual Studio Code container extensions
Specific extensions for this container are installed. Local extensions should be disabled for this container to prevent poor performance in Visual Studio Code and avoid other side effects. Container-specific extensions are listed in the file located at: .devcontainer/devcontainer.json. and are required, included extensions are:
ms-vscode.cpptools
ms-vscode.cmake-tools
ms-vscode.cpptools-extension-pack
ms-vscode.makefile-tools
ms-python.vscode-pylance
ms-python.python
“ms-python.debugpy”
“vadimcn.vscode-lldb”
rust-lang.rust-analyzer”
xyz.local-history
Extensions not automatically installed?
While these extensions should install automatically, I have experience issues with them. Check is they if are installed, and if not them manually with the command below: In the opened container in the VS Code terminal session enter:
  code --install-extension ms-python.vscode-pylance
  code --install-extension ms-python.python
  code --install-extension ms-vscode.cpptools
  code --install-extension ms-vscode.cmake-tools
  code --install-extension ms-vscode.makefile-tools
  code --install-extension rust-lang.rust-analyzer
  code --install-extension ms-vscode.cpptools-extension-pack
  code --install-extension ms-python.debugpy
  code --install-extension xyz.local-history
  code --install-extension vadimcn.vscode-lldb
Similar to the extensions, we also provide default settings for this container. These settings define the global configurations as well as the default build and run behavior. The build and run behavior is explained in the next section (4.3). See the side note below for details.
VSC Build tasks
In the menu ‘Terminal -> Run Tasks…‘ You can find the build task for our project, which are defined in the .vscode directory in the file ‘tasks.json’. All our build task start with the prefix: AFX (_AFX are implementation task and are by default hidden)
Task name Description AFX BUILD 1: Libraries (Rust,LINUX) Builds the Rust libraries inside: src_backend\api_interface_rust for Linux (with question) AFX BUILD 2: Libraries (Rust,WINDOWS) Builds the Rust libraries inside: src_backend\api_interface_rust for Windows (with question) AFX BUILD 3: Client Library Tester (Rust LINUX, debug) Builds the client test program related to the Rust library in 1(see also create 5) AFX Create 4: business Library (Rust) This create a whole new Rust library in: src_backend\api_interface_rust AFX Create 5: Client Library Tester (Rust LINUX) This Creates the client test program for a Rust library (see also 3 for build) AFX CLEAN 6: Rust Libraries (LINUX Debug,release) Removes all build artifacts for the Linux release, Debug and Release AFX CLEAN 7: Rust Libraries (WINDOWS Debug,release) Removes all build artifacts for the Windows release, Debug and Release
Run &Debug
A few launches are defined
- Python (Debugpy) for python
- Python + Rust for Python and Rust libraries
In All case you must make sure tha the Rust library is build AFX BUILD task 1. This is beacuse the current main.py sample call the Rust (Rust call internal and other library which is build together with Rust) and functions
4.5 Backup
There is a simple backup script which you can use to backup the project to shared-host directory. In a Docker shell (root) execute:
./_backup
Appendix I - Quick setup
Quick setup
If you have previously installed this container, you can use the quick setup steps below. Otherwise please first read the how to create a development container document.
- In case you don’t have the WSL container, open CMD in the folder: ‘APP-X11-Forward-PyCRust-Development-Template-Stack\Base-Container\Afx-Base-PyCRust-Service' and execute:
wsl --import docker-dev-pycrust ./wsl2-distro "install.tar.gz"
- Create docker base container (Afx-Base-PyCRust-Service)
docker-compose -f compose_app_forward_x11_pycrust_base.yml up -d --build --force-recreate --remove-orphans
- Install C++ sub-container (PyCRust-Project-Service)
docker-compose -f compose_pycrust_project.yml up -d --build --force-recreate --remove-orphans
Start WSL
wsl -d docker-dev-pycrust
Attach docker
docker exec -it PyCRust-Project-Service /bin/bash
# If the container cannot be found, restart the Docker app and ensure
# WSL integration is enabled in Docker settings!
VSC extensions
After this you should be able to open the container in VSC and start developing, be sure to run the following commands(in the container) first to make sure the required extensions are installed:
code --install-extension ms-python.vscode-pylance
code --install-extension ms-python.python
code --install-extension ms-vscode.cpptools
code --install-extension ms-vscode.cmake-tools
code --install-extension ms-vscode.makefile-tools
code --install-extension rust-lang.rust-analyzer
code --install-extension ms-vscode.cpptools-extension-pack
code --install-extension ms-python.debugpy
code --install-extension xyz.local-history
code --install-extension vadimcn.vscode-lldb
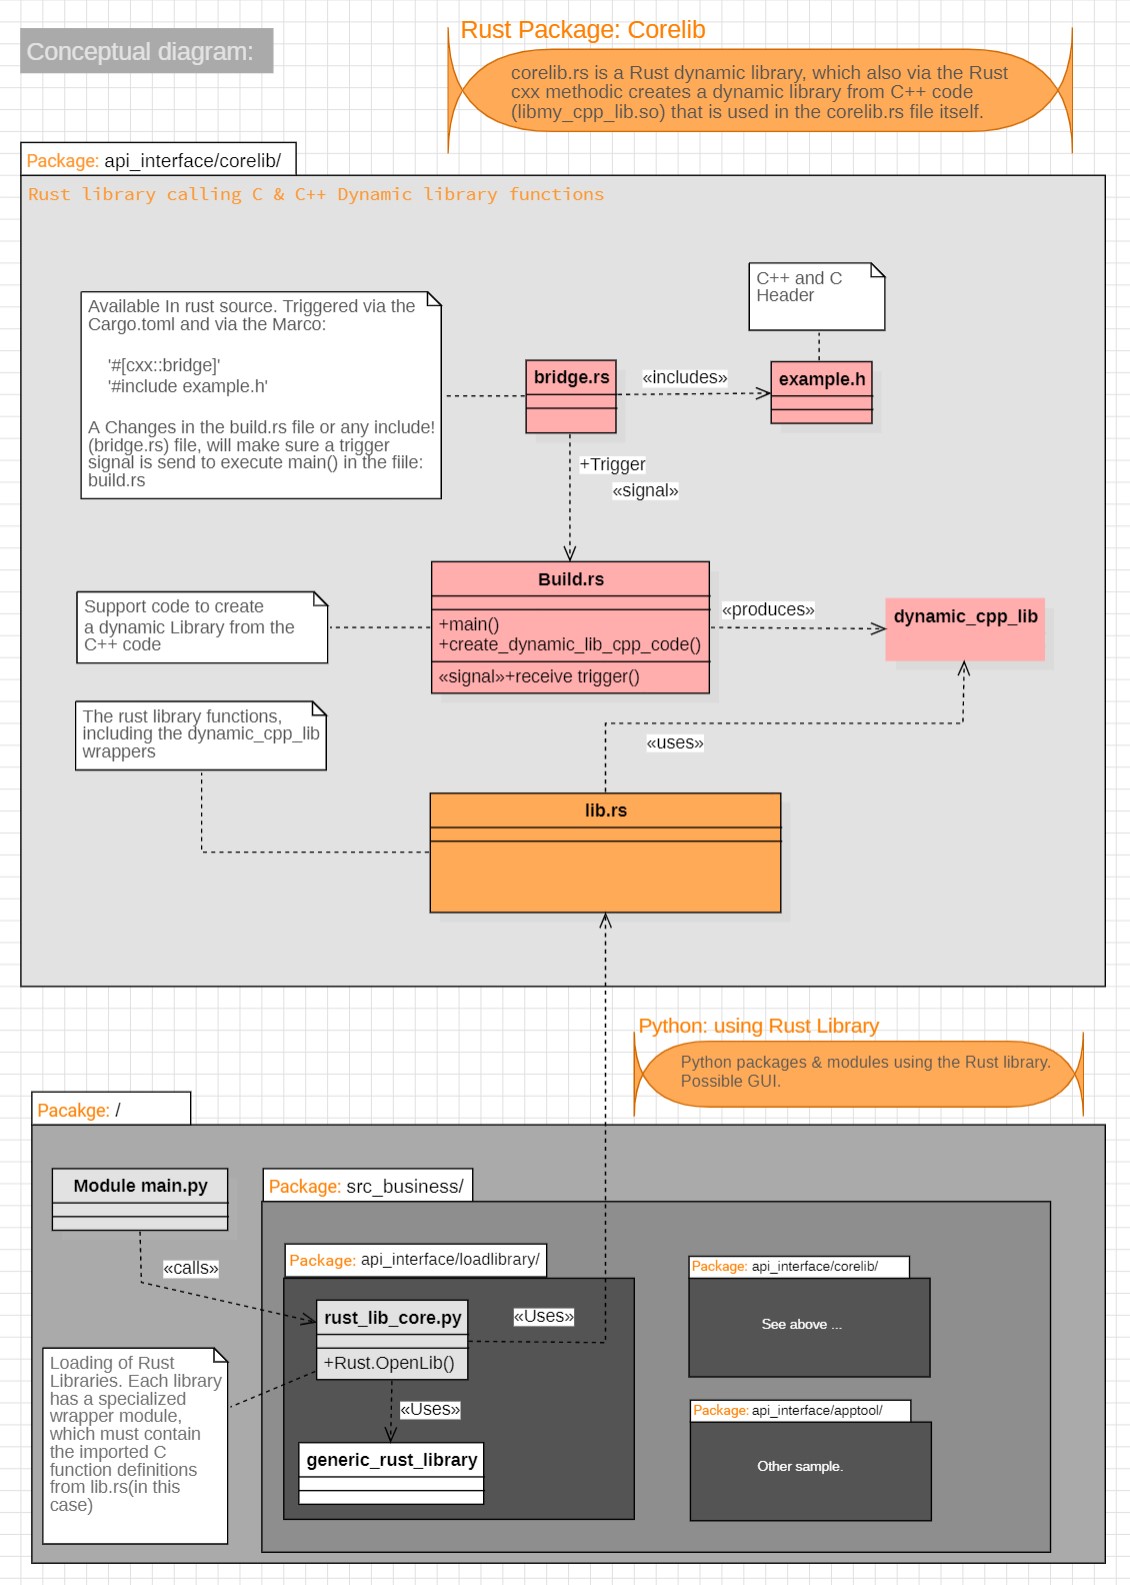
Appendix II - pycrust template structure
Pycrust template structure
Following is a concept diagram of the sample Rust library ‘core_lib’ which internally opens an other C++ library and call a function from there
License
This file is part of: Python/Rust/C++ Development Stack Copyright (c) 2025-2026 Nico Jan Eelhart.This repository is MIT licensed and free to use. For optional commercial support, customization, training, or long-term maintenance, see COMMERCIAL.md.
─── ✦ ───