Win32 Native C++ Template - WSL Setup & Usage Guide
ℹ️ Introduction
This WSL Linux (Ubuntu 24.04) native Win32 C++ distribution is designed for developing Win32 C++ GUI applications via the WSL container while using the host compiler and SDK. It also sets up a template project which can be instantiated with Cookiecutter
🎯 Architecture of the Container
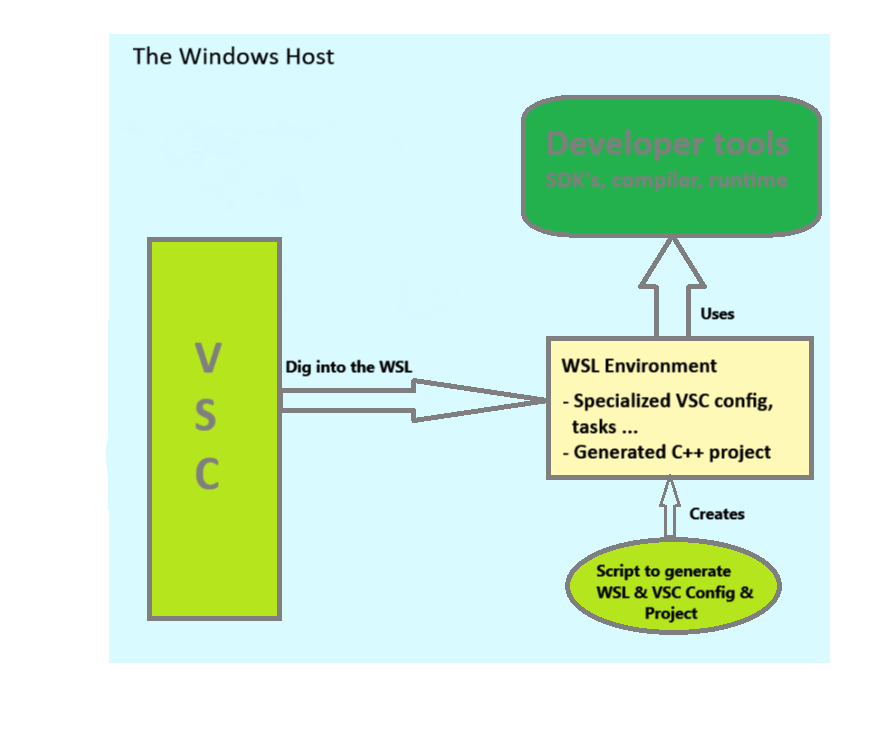
A setup script is used to create the WSL distribution inside a container. This WSL container includes the Linux distribution, a C++ template project, and all specialized Visual Studio Code (VSC) configuration files required to build, run, and debug the C++ project. The C++ template project is based on Cookiecutter and serves as a foundation from which new projects can be instantiated, allowing you to easily create multiple independent projects.
In contrast with the Docker App-X11-Forward-win32-CPP-Development-Template Stack see here which provides a cross-compilation environment for MinGW, this setup offers a native Win32 environment. In this configuration, the compiler and SDK from the Windows host system are used directly and must therefore be available on the host. The advantage of this native stack is that it supports building all types of programs, whereas the cross-compilation stack is primarily suited for more traditional or desktop-oriented applications. The trade-off is that some post-configuration may be required to integrate the compiler and SDKs with Visual Studio Code. (If you have Visual Studio 2022 Professional installed in its default location, minimal adjustment should be needed.) Unlike cross-compiler environments for MinGW, this is a native Win32 environment where the compiler and SDK from the host are used and must therefore be available. The advantage over the cross-compiled stack is that all types of programs can be created, whereas the cross-compiled stack is limited to more ‘traditional’ and desktop-oriented applications. The disadvantage of this stack is that some post-configuration is required to integrate the compiler and SDKs with Visual Studio Code (if you have Visual Studio 2022 Professional installed in the default location, you may not need to make many adjustments)
All related verification steps are provided later in this document (see section 5.3).The image below illustrates how the components interact once setup is complete. Following the image, the Data locations table describes the folder and file structure in detail.
📁 The WSL Files and folders
Data Locations, Within root ‘WSL-Native-Win32-CPP'
| Folder | Purpose |
|---|---|
| \ | ‘WSL-Native-Win32-CPP’ root folder, holding the CreateWSL.ps1 script |
| _Installs_Required | This and potential other documentation |
| \Project-Templates | C++ folder and files for the project template |
⚙️ The Setup
⚡ Download the Ubuntu WSL version (preparation)
Finding this version can be challenging, especially since we need manual installation files (with .Appx or .AppxBundle extensions). The Windows Store provides a direct installer, but we cannot use it because we need to control the installation name and location. Follow the steps in the background Notes below to obtain the required file: ‘install.tar.gz’. (Note also that it is not allowed for this site to redistribute this file direct)
Get the WSL Installation file🔧
Download the WSL packages
- From here.
- Scroll to the *“Downloading distributions” section.
- Download the Ubuntu 24.04
.AppxBundle(this guide assumes this version). - Unpack the package, like, assuming you downloaded
Ubuntu2404-240425.AppxBundle:
Get the right WSL Import file
- Rename
Ubuntu2404-240425.AppxBundletoUbuntu2404-240425.zip - Unpack it using 7zip or similar
- Find
Ubuntu_2404.0.5.0_x64.appx- Rename it to:
Ubuntu_2404.0.5.0_x64.zipunpack it. - Unpack it.
Result you’ll get the file:install.tar.gzthis is what you’ll use in the next step,
- Rename it to:
─── ✦ ───
⚙️ Create the WSL environment (including our packages and template files)
Once we have the WSL installation file (install.tar.gz), we can generate our WSL environment with the required packages. We do this by executing the custom script CreateWSL.ps1
- Type in the following command:
./CreateWSL.ps1 MyWSL
This expects the Ubuntu source to be located at: ./_Installs_Required/Ubuntu_2404.0.5.0_x64/install.tar.gz
If this is located in a different folder, you need to specify the full path in the above command:
./CreateWSL.ps1 MyWSL ./WSL-target-dir project-name /mnt/d/project-location ./folder-to-your-installation/install.tar.g
After 3 till 5 minutes:
- This creates your WSL under the name: MyWSL in the folder: /WSL-target-dir
- With a project name: project-name where project will be in: /mnt/d/project-location
- And it will use the folder: ./folder-to-your-installation/install.tar.gz as source installation for the WSL
- With a project name: project-name where project will be in: /mnt/d/project-location
Remark: As an alternative you can adjust the defaults in the python file
- To get more information about the program (includes an option to add a package to an existing WSL), type:
./CreateWSL.ps1 /?
🏃♂️Start the WSL container
To start and manage your WSL container , use the following commands:
wsl -d distribution_name            #  using this command from your prompt will start the container
                                    #  Use 'exit' to return to Windows. while it remains started
wsl --list --verbose                #  Optional. Check if it is running (in other Windows CMD)
wsl --terminate distribution_name   #  Stops the distribution
wsl --unregister distribution_name  #  Removes the container, careful!
wsl --set-default distribution_name #  Set default when running command; wsl
▶️ Using Visual Studio Code and configuration checks
Open the Application Environment in VS Code (@host)
- Press CTRL-SHIFT-P or F1 and start typing WSL: Connect to WSL using distro in new Window…
- Select your WSL container This opens a new VSC Window with the container.
Open Folder and building your app
- Use the VSC Explorer and select Open Folder to open the remote container’s folder. Ensure that you open the correct folder so the .vscode directory settings are applied properly. The name of the folder used can also be found in Results.txt
When opening the WSL container and project root folder in Visual Studio Code, a dedicated Visual Studio Code server will be installed within the container. This server provides a full Visual Studio Code environment with its own settings and extensions. Upon opening the folder for the first time, the system will detect any required extensions and prompt you to install them. Follow the instructions to complete the installation if prompted. If IntelliSense indicates errors in one of the project files, this is likely due to a missing extension.
Check VSC config and build files
Please check these files for the correct SDK paths and compiler. They should point to your host directory, where the C drive is represented as /mnt/c
- ./vscode/c_cpp_properties.json Check:
- IncludePath
- CompilerPath - ./vscode/settings.json Check:
- C_Cpp.default.compilerPath
- C_Cpp.default.includePath - _buildtask.bat Check variable
- VSDEV_CMD_PATH (top of file)
VSC Use build tasks
In the menu ‘Terminal -> Run Tasks…‘, you can find the build tasks for our project, which are defined in the settings file (see the side note above). The following tasks are defined for our project:
- AFX Configure Make 64 bits(CMake)
Call this first! To create the makefiles for the 64-bits application. Creates the folder: ‘_build64’ - AFX Clean all
Remove the _build64 folder, you need to regenerate the makefiles again(see above) - AFX Build Debug
Creates _build64/bin/debug/outapp.exe - AFX Build Release
Creates _build64/bin/release/outapp.exe - AFX Clean debug
removes bin and obj files for debug - AFX Clean release
removes bin and obj files of release - AFX Run Debug
Runs debug outApp - AFX Run Release
RUns Release outApp
License
This file is part of: WSL Native Win32 C++ Stack Copyright (c) 2025-2026 Nico Jan Eelhart.This repository is MIT licensed and free to use. For optional commercial support, customization, training, or long-term maintenance, see COMMERCIAL.md.
─── ✦ ───